Saturday, May 16, 2020

JPA entity removal fails silently


>PROBLEM


The JPA remove command was silently ignored.
There was no delete statement on server's output even though the show_sql was enabled:
 
<property name="hibernate.show_sql" value="true"></property>
 
 
The issue was around an OneToMany relation where:
todo 1 --- * todoitem
 

Attempt to delete an instance on any side fails silently, without having the respective "delete" command on the server's output and no exception message of any type.


>SOLUTION

 
First, I switched the many side's code suggested by the Wildfly18/JBoss documentation in its examples from:
 
//    @Override
//    public void delete(Todoitem todoitem) {
//        if (todoitem == null) {
//            return;
//        }
//        if (!emPg.contains(todoitem)) {
//            todoitem = emPg.merge(todoitem);
//        }
//        emPg.remove(todoitem);
//        emPg.flush();
//        emPg.clear();
//    }
    

To an equivalent form:
 
    @Override
    public void delete(Todoitem todoitem) {
        if (todoitem == null) {
            return;
        }
        Todoitem ti = emPg.find(Todoitem.class, todoitem.getId());
        if(ti == null) {
            return;
        }
        emPg.remove(ti);
        emPg.flush();
        emPg.clear();
    }
 

Unfortunately, I got the same result - removal silently ignored.
 

Then, I suspected of the database, since hibernate handles its own keys. I had done many tests during implementation...
To be sure about the consistency issues, I've decided to empty the database deleting the content of both sides of the relation.
Then I created new entity instances and relations using the application's resources (no SQL command) since everything was working well except for entity removal.
After, I checked the database relations using SQL command to make sure everything was fine, and it was.
 
Next, I tried a new test again but this time it was successful.

Then I reverted the code, uncommenting the commented code and vice-versa and tested again.
The test failed again, returning same result — silently ignoring remove.

I set back the code to the previous condition testing again to confirm results.
The confirmations was successful, confirming suspicion of two issues, database and code implementation.
 
Since good news, I repeated the same to the "One" side (code below - the commented code is the initial one inherited from Wildfly 18 documentation, as above mentioned). 
 
From:
//    @Override
//    public void delete(Todo todo) {
//        if(todo == null) {
//            return;
//        }
//        if (!emPg.contains(todo)) {
//            todo = emPg.merge(todo);
//        }
//        //todoitemDao.deleteAll(todo);
//        emPg.remove(todo);
//        emPg.flush();
//    }
 
 
To:
    
    @Override
    public void delete(Todo todo) {
        if (todo == null) {
            return;
        }
        Todo t = emPg.find(Todo.class, todo.getId());
        if(t == null) {
            return;
        }
        emPg.remove(t);
        emPg.flush();
        emPg.clear();
    }


Issue solved. Success.
 

IMPORTANT NOTE:
 
Check the removal tests by using the SQL statements straight on the database.
Sometimes the instance seems not being removed due to cache issue or code implementation fault, requiring to be treated apart.


>ENV


- JSF
- Wildfly 18 (JPA default implementation - Hibernate)
- PostgreSQL 10


>NOTE

Published also on Stackoverflow

Wednesday, May 6, 2020

WILDFLY/JBOSS: WFLYJPA0061: Persistence unitName was not specified and multiple persistence unit definitions


>PROBLEM

Creating a persistence.xml file having two persistence units caused the following Wildfly's error message:

Caused by: java.lang.IllegalArgumentException: WFLYJPA0061: Persistence unitName was not specified and there are 2 persistence unit definitions in application deployment deployment "todos.war". Either change the application deployment to have only one persistence unit definition or specify the unitName for each reference to a persistence unit.

The persistence.xml configuration used was:


<?xml version="1.0" encoding="UTF-8"?>
<persistence version="2.1"
   xmlns="http://xmlns.jcp.org/xml/ns/persistence" xmlns:xsi="http://www.w3.org/2001/XMLSchema-instance"
   xsi:schemaLocation="
        http://xmlns.jcp.org/xml/ns/persistence
        http://xmlns.jcp.org/xml/ns/persistence/persistence_2_1.xsd">
        
    <persistence-unit name="primary">
       <jta-data-source>java:jboss/datasources/TasksJsfQuickstartDS</jta-data-source>
       <properties>
          <!-- Properties for Hibernate -->
          <property name="hibernate.hbm2ddl.auto" value="create-drop" />
          <property name="hibernate.show_sql" value="false" />
       </properties>
    </persistence-unit>

    <persistence-unit name="pgTestoneDS">
       <jta-data-source>java:jboss/datasources/pgTestoneDS</jta-data-source>
       <properties>
<!--           <property name="hibernate.hbm2ddl.auto" value="create-drop" /> -->
<!--           <property name="hibernate.show_sql" value="false" /> -->
       </properties>
    </persistence-unit>

</persistence>


>SOLUTION

After some failures, I've decided to repeat the same configuration but doing the things in a different order.
The following order was successful:

1. Refactor the code that concerns the primary persistent-unit (or the the initial persistent-unit, whatever the name it has).

2. Create a qualifier to this first perstent-unit.

3. Refactor the dao layer in order to apply the its qualifier where the entity maneger is injected.

4. Recompile the project and perfome a full deploy.

5. Start the server and test.

6. Stop the server

7. If not successful, fix the code revising from step 1.

8. if successful, add the second persistent-unit to persistence.xml file.

9. Create the  database manager class, its qualifier, the entities and dao layer always using the respective qualifier for the second persistent-unit to differ from the initial code implemented for the first persistent-unit.

10. Recompile the project and perfome a full deploy.

11. Start the server and test.


Source code available at the link below.


>WHAT NOT TO DO

This site is dedicated to provide straight problem/solution approach, but sometimes it is valuable to lean from the mistakes but this kind of approach doesn't fit here.
To get more details and source code, point to WILDFLY/JBOSS: WFLYJPA0061: Persistence unitName was not specified and double persistence unit definitions


>ENV

Windows 10
Wildfly 18
JEE/CDI/JPA


Thursday, April 30, 2020

[ERROR] Non-resolvable import POM: Failure to find org.wildfly.bom:wildfly-jakartaee8-with-tools:pom:20.0.0.Beta1-SNAPSHOT


>PROBLEM


After download of Wildfly QuickStart Examples (https://github.com/wildfly/quickstart), the attempt to run the command
mvn clean package -Pdocs
to generate documentation, fails and returns:

Non-resolvable import POM: Failure to find org.wildfly.bom:wildfly-jakartaee8-with-tools:pom
[ERROR] Non-resolvable import POM: Failure to find org.wildfly.bom:wildfly-jakartaee8-with-tools:pom:20.0.0.Beta1-SNAPSHOT in https://repository.jboss.org/nexus/content/groups/public/ was cached in the local repository, resolution will not be reattempted until the update interval of jboss-public-repository-group has elapsed or updates are forced @ org.wildfly.quickstarts:quickstart-parent:20.0.0.Beta1-SNAPSHOT, L:\work\devcli_\java\lab\jsf\wildfly_quickstart-master\pom.xml, line 106, column 25 -> [Help 2]


>SOLUTION


Inspecting the repository defined by the pom.xml:

repository.jboss.org/nexus/content/groups/public/
and it respective package was not found:


I tried to find another repository containing 20.0.0.Beta1-SNAPSHOT version, but it was being time consuming, so after "time out" I've decide that the most practical solution would be use the last final version.

That way the pom.xml file was switched to 19.0.1.Final version and the commands executed successfully.


SOURCES


Original pom.xml
wildfly_quickstarts_20_0_0_Beta1-SNAPSHOT
L:\transp\1___downloads\wildfly_quickstarts_pom_19_0_1_Final.txt


The original pom.xml switched to 19.0.1.Final:

wildfly_quickstarts_pom_19_0_1_Final
NOTE:  I also let some additional repositories found during the survey, just in the case.


ADDITIONAL TIP

The project's pom.xml file also requires the respective adjustment to 19.0.0.Final version.
Using the helloworld project as example, switch the version value in 19.0.0.Final element to match the parent's new version.

    <parent>
        <groupId>org.wildfly.quickstarts</groupId>
        <artifactId>quickstart-parent</artifactId>
        <!--
        Maintain separation between the artifact id and the version to help prevent
        merge conflicts between commits changing the GA and those changing the V.
        -->
        <version>19.0.0.Final</version>
        <relativePath>../pom.xml</relativePath>
    </parent>

helloworld's source file:
wildfly_quickstart_helloworld_project_pom


- Result:


>ENV


java 13
maven 3

Wednesday, April 22, 2020

[javax.enterprise.resource.webcontainer.jsf.config] (MSC service thread 1-5) Critical error during deployment: : com.sun.faces.config.ConfigurationException:


>PROBLEM

After deploying the project then starting the server it is returned the following message:

11:56:58,222 GRAVE [javax.enterprise.resource.webcontainer.jsf.config] (MSC service thread 1-5) Critical error during deployment: : com.sun.faces.config.ConfigurationException:
  Source Document: vfs:/L:/portables_d/jboss-as-7.1.1.Final_8080_proeducacao_2/standalone/deployments/bin1371_eshop.war/WEB-INF/lib/richfaces-core-impl.jar/META-INF/faces-config.xml
  Cause: Unable to create a new instance of 'org.richfaces.resource.ResourceHandlerImpl': java.lang.reflect.InvocationTargetException


>SOLUTION

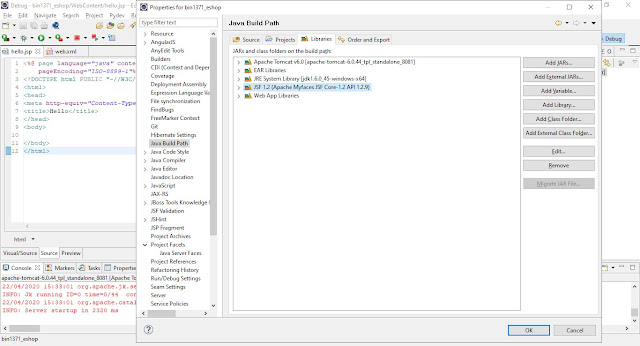
This happens when is skipped a step of the "New Dynamic Web Project" wizard where the JSF is set.
On the "JSF Capabilities" during creation it is necessary to define JSF library.


Also check if the "Java Server Faces" configuration on Project Facets matches the "Java Build Path" configuration.

Go to Navigator panel, point on the project then Alt + Enter to access project's properties.
Se the same jar path configuration set on Java, Build Path, Libraries tab and find to where you jar libs are pointing to.
Use the same configuration for Java Server Faces properties. Point to Project Facets , Java Server Faces.


>ENV

eclipse luna
windows 10
jsf/seam project

Wednesday, April 15, 2020

JBOSS: JBAS014775: New missing/unsatisfied dependencies:


>PROBLEM


Starting JBoss, the server fails to load datasource throwing the following message:

18:21:37,781 INFO  [org.jboss.as.controller] (Controller Boot Thread) JBAS014774: Service status report
JBAS014775:    New missing/unsatisfied dependencies:
      service jboss.jdbc-driver.mysql (missing) dependents: [service jboss.data-source.java:jboss/datasources/mysqlTestoneDS, service jboss.data-source.java:jboss/datasources/proeducacaoDS] 


>SOLUTION

Check the configuration and change driver.
You may choose checking on or other in first place. It on your guess.


CHECKING DATASOURCE CONFIGURATION

standalone.xml
Go to JBoss install dir and open the standalone.xml file.
For instance:
D:\jboss-as-7.1.1.Final_8080\standalone\configuration\standalone.xml

The configuration shall be something like this:


DATABASE MODULE
Go to JBoss install dir under modules\com\mysql\main folder.
For example:
D:\portables_d\jboss-as-7.1.1.Final_8080\modules\com\mysql\main

Open file the file having .index suffix.
Example:
mysql-connector-java-5.1.13-bin.jar.index


Compare with the configuration in the standalone.xml file:

                    
<driver name="mysql" module="com.mysql">
   <driver-class>com.mysql.jdbc.Driver</driver-class>
</driver>


In this case, they match.
The required class is present in the jar of the database's driver.
If the configuration is ok, then it is time to test another version for the driver.


SWITCHING DRIVERS


Replace the current driver for a new one.


In this case, switching to a newer driver it was enough.


Restart JBoss.

RESULT

SUCCESS


>ENV

jboss-as-7.1.1.Final
Windows 10
Mysql 5.X

Tuesday, April 14, 2020

How to Implement a JavaScript Project Using Express with ORM (Sequelize), MVC model, OO (Object-Oriented programming) and Design Patterns?


>PROBLEM

The usual approach of JavaScript programmers makes no use of object-oriented programming, or mixes both styles, the "function-oriented" approach, common on this kind of platform due to its origins from browser's programming — old times!  Please, do not take this for functional programming that it is something different.
Just because it is used "functions" instead of classes doesn't mean that it is necessarily functional programming.

The old approach although fast and easy in some way, becomes cumbersome over time, turning out a project with difficult maintenance, cohesion issues, and tangled code.

ES6 offers a marvelous object-oriented implementation, easy and practical.

ORM is a key concern to decouple persistence.
Persistence pattern turns code concise and reusable extending resources and providing cohesion.

Another side effect is that ORM is more secure.
It may protect against SQL injection.

After Node.js, JavaScript becomes a "grown-up boy", having its own platform to run full implementation across a project, and no more a "browser's language".

How to use OO/ORM/DAO patterns with JavaScript/Node.js?


>SOLUTION

Since this kind of approach is relatively new for JavaScript programmers and not very popular although used by seniors developers, it is easier than supposed.


In order to become accessible for everyone who intends to evolve adopting the ES6's OO resources, the subject was split into pieces ("
Jack methodology") to turn things easier — it was created a step-by-step tutorial.


The code isn't a definitive version for production, but a good start to get the grips of it.

NODE.JS: SEQUELIZE TUTORIAL SERIES
(Revision 2022 using Node.js v.16)


Enjoy!


Thursday, March 5, 2020

LĂ³gica MĂ­ope


Eu li esta manchete na BBC dizendo que o nosso hĂ¡bito por assistir streaming vai poluir o planeta ainda mais intensamente com a adoĂ§Ă£o do 5G.
EntĂ£o o texto explica o porquĂª informando que muitos datacenters no mundo sĂ£o movidos a energia fĂ³ssil (derivados de petrĂ³leo, carvĂ£o).

O detalhe da mĂ¡ fĂ© ou da "percepĂ§Ă£o mĂ­ope" da manchete Ă© transferir a culpa para o usuĂ¡rio final de um problema de infraestrutura energĂ©tica mundial.

Ok entĂ£o, seguindo a "lĂ³gica tambĂ©m fĂ³ssil" do artigo inglĂªs, vamos parar de assistir videos.

Oras, se nĂ£o estamos na frente da tela, estamos na frente da direĂ§Ă£o, que por sua vez tambĂ©m usa energia fĂ³ssil.
E aqueles que nĂ£o usam carro para a diversĂ£o, certamente usam de forma indireta algum serviço que faz uso de combustĂ­veis fĂ³sseis.
Bares precisam de mercadoria, que sĂ£o transportadas por caminhões ou trens que tambĂ©m usam combustĂ­vel fĂ³ssil.
A energia dos bares, cinemas, teatros e etc em muitos locais do planeta tambĂ©m sĂ£o abastecidos por energia fĂ³ssil.

EntĂ£o, entre na geladeira no final de semana e evite trabalhar, porque viver polui!!!

É mais do que evidente que nĂ£o sĂ£o os usuĂ¡rios diretos ou indiretos na cadeia de serviços os verdadeiros responsĂ¡veis, mas o modelo econĂ´mico de geraĂ§Ă£o de energia mundial que precisa de uma revisĂ£o urgente.

Ao usuĂ¡rio final cabe apenas concientizaĂ§Ă£o atravĂ©s da pressĂ£o polĂ­tica na cobranĂ§Ă£o da revisĂ£o desse modelo.
De nada vai adiantar polĂ­ticas simplistas que buscam "congelar a atividade da humanidade".

A soluĂ§Ă£o vem do esforço conjunto da ciĂªncia amparada pelo desejo polĂ­tico, porque parar de viver para nĂ£o poluir faz tanto sentido quanto poluir atĂ© parar de viver.

What a short sighted vision BBC.co.uk !!!


TranscriĂ§Ă£o parcial do texto da BBC:

With the launch of streaming services from Disney and Apple, the rollout of 5G and the growth in cryptocurrencies, experts are warning about the impact this huge rise in data use could have on the environment.

There are now hundreds of thousands of data centres around the world, storing everything from viral videos to doctors' notes and even bank account details. Many of them run on electricity generated by burning fossil fuels.

Film and TV writer Beth Webb went in search of the internet and discovered that 'the cloud' is actually a vast network of energy-guzzling data centres and undersea cables.

Saturday, February 22, 2020

Do You Use Wi-Fi For Sensitive Information. Check this attack to stop using it. Better than too late...

Chrome's message: "Managed by Your Organization" ISSUE


Suddenly, appears on chrome's menu the following message:
"Managed by your organization"


>SOLUTION

Go to:
ENGLISH VERSION

--------------------------------------------------------------------------------------------------------
(portuguese)

Mensagem do chrome: "Gerenciado por sua organizaĂ§Ă£o" - SOLUĂ‡ĂƒO

Apareceu inesperadamente no menu do chrome a seguinte mensagem:
"Gerenciado por sua organizaĂ§Ă£o"

>SOLUĂ‡ĂƒO

VĂ¡ para:
PORTUGUESE VERSION


Sunday, February 9, 2020

JRE vs. JDK vs. SE vs. OpenJDK , ETC.


Are you a little lost with so many terms for a download in Java?

So I got one day when I decided to do some research, homework delayed since happened so many new events in the Java world that shook it require a revision to check how things became, just to make sure. Below, you find a summary containing the source links.
Below you get a summary.


Pointing to OpenJDK there is a link to Java SE 13 where it is found the information below (italic), plus some research,  lead me to the following conclusion:

JDK is used as it was before Oracle's acquisition - for Java development that contains free and may have proprietary code under licenses' conditions.

The Java SE is a "reference implementation" - text in italic, where we find the purpose of it.
There are also Enterprise Edition and Micro Edition platforms

OpenJDK is the open-source enterprise to maintain the free version of Java.

JRE is the Java virtual machine to run Java applications developed by JDK or OpenJDK kits.


NOTE FROM THE SITE AT Java SE 13

Java Platform, Standard Edition 13 Reference Implementations
The official Reference Implementation for Java SE 13 (JSR 388) is based solely upon open-source code available from the JDK 13 Project in the OpenJDK Community.
The binaries are available under the GNU General Public License version 2, with the Classpath Exception.
These binaries are for reference use only!
These binaries are provided for use by implementers of the Java SE 13 Platform Specification and are for reference purposes only. This Reference Implementation has been approved through the Java Community Process. Production-ready binaries under the GPL are available from Oracle; and will be in most popular Linux distributions.


>Baeldung's Comment


JDK (Java Development Kit) is a software development environment used in Java platform programming. It contains a complete Java Runtime Environment, a so-called private runtime. The name came from the fact that it contains more tools than the standalone JRE as well as the other components needed for developing Java applications.

Oracle strongly recommends using the term JDK to refer to the Java SE (Standard Edition) Development Kit (there are also Enterprise Edition and Micro Edition platforms).
Not all releases will be the Long-Term-Support (LTS) releases. As a result of Oracle's release plan, the LTS product releases will happen only every three years.

Java SE 11 is the latest LTS version, and Java SE 8 will be receiving free public updates until December 2020 for non-commercial usage.
This development kit got its current name after Oracle bought Sun Microsystems in 2010. Before that, the name was SUN JDK, and it was the official implementation of the Java programming language.

@FROM:
www.baeldung.com/oracle-jdk-vs-openjdk


JAVA DOWNLOADS

>ORACLE

www.java.com/en/download/


>NEW ORACLE LICENSE

Java Download

Download Java for your desktop computer now!
Version 8 Update 241Release date January 14, 2020
Important Oracle Java License Update

The Oracle Java License has changed for releases starting April 16, 2019.

The new Oracle Technology Network License Agreement for Oracle Java SE is substantially different from prior Oracle Java licenses. The new license permits certain uses, such as personal use and development use, at no cost -- but other uses authorized under prior Oracle Java licenses may no longer be available. Please review the terms carefully before downloading and using this product. An FAQ is available here.
Commercial license and support is available with a low cost Java SE Subscription.
Oracle also provides the latest OpenJDK release under the open source GPL License at jdk.java.net.


>OpenJDK

jdk.java.net
OpenJDK is a free and open-source implementation of the Java SE Platform Edition. It was initially released in 2007 as the result of the development that Sun Microsystems started in 2006.
Certainly, we should emphasize that the OpenJDK is an official reference implementation of a Java Standard Edition since version SE 7.
Initially, it was based only on the JDK 7. But, since Java 10, the open-source reference implementation of the Java SE platform is the responsibility of the JDK Project. And, just like for the Oracle, the JDK Project will also deliver new feature releases every six months.
We should note that before this long-running project, there were JDK Release Projects that released one feature and then got discontinued.


>Oracle JDK vs. OpenJDK

baeldung.com/oracle-jdk-vs-openjdk

>Licenses


Oracle JDK was licensed under Oracle Binary Code License Agreement, whereas OpenJDK has the GNU General Public License (GNU GPL) version 2 with a linking exception.
There are some licensing implications when using Oracle's platform. Public updates for Oracle Java SE 8 released after January 2019 will not be available for business, commercial, or production use without a commercial license, as Oracle announced. However, OpenJDK is completely open source and can be used it freely.

>Performance

There is no real technical difference between the two since the build process for the Oracle JDK is based on that of OpenJDK.
When it comes to performance, Oracle's is much better regarding responsiveness and JVM performance. It puts more focus on stability due to the importance it gives to its enterprise customers.
OpenJDK, in contrast, will deliver releases more often. As a result, we can encounter problems with instability. Based on community feedback, we know some OpenJDK users have encountered performance issues.

Thursday, January 30, 2020

UNABLE TO RESTORE TO A PREVIOUS RESTORE POINT USING WINDOWS


>PROBLEM

After some operation, the Windows system becomes no more accessible.
Then how to restore to a previous "restore point" if Windows is not running.


>SOLUTION

Just to remember that a restore point is also accessible using the Repair/Rescue disk created by the same version of the system that requires repair.

Reboot using de Repair/Rescue disk and choose the respective option.


CREATE IMAGE BACKUP WINDOWS 10 CREATION FAILS DUE TO CORRUPTED VOLUME


>PROBLEM

Attempt to create a Windows system image using Windows native tool returns an error message like this:

Failed to create image due to corrupted volume \\{9834834138743...}


>SOLUTION

Restart the machine using the Windows Repair/Rescue disk of the same version of the system that requires repair. Do not use different a version even though it seems to work fine.

Select the option "Windows Memory Diagnostic Tool"

I know, it seems awkward because the first thing that triggers our minds is something about the RAM memories itself.


Windows Cannot Find a System Image on This Computer


>PROBLEM


Windows 10 Fails to Find System Image Backup

Attempt to restore a system image fails because the Repair/Rescue disk is not able to present the backup list, unlike the image below, the fields always return blank, without result.

An attempt to select a system image (radio option above to the buttons) returns an empty list.


NOTE - POST EXTENDED
Other issues and additional solutions are available here (an extension of this post), including the download of the Windows Rescue/Repair iso image to create a bootable CD or pen drive.


>SOLUTION


Supposing the source HDs where the images were saved are NOT corrupted, try another Repair/Rescue disk created by the same version of Windows that created the system images.

This issue may happen when an image is created with a different version of Windows than the Windows version that created the Repair/Rescue disk.

If you do not have another machine, try to find somebody who has a Windows system similar to your system, then create the rescue disk.


Wednesday, January 22, 2020

node.js: TypeError: Router.use() requires a middleware function but got a Object


>PROBLEM

Running node.js/express application, returns error:

TypeError: Router.use() requires a middleware function but got a Object


>SOLUTION

Go to the router files and check if module.export sttm is present.
Example:

module.exports = router;

>ENV

node.js v12.4.0
Express
Windows 10


Monday, January 20, 2020

node.js: req.body.PARAM_NAME fails returning undefined


Many times a failure comes from subtle things.

Both app.post/app.get  and  router.post/router.get accepts req.body.PARAM_NAME.

Example:

app.get('/', function(req,res){
 var email = req.body.email;
 var password = req.body.passwd;
 console.log('email: ' + email);
 console.log('pass: ' + password);
 res.render("index");
});

router.get('/alo/', function(req, res, next) {
 var email = req.body.email;
 var password = req.body.passwd;
 console.log('email: ' + email);
 console.log('pass: ' + password);
 res.render('alo', { title: 'Alo Express!' });
});

When using router and req.body returns undefined values, check if the code is well implemented, if not missing module.exports clause.

Follow by the example.

app.js file:
..
const indexRouter = require('./routes/indexRouter');
app.use('/', indexRouter);
..
module.exports = app;
 
indexRouter.js file:
..
const router = express.Router();
..
router.get('/alo/', function(req, res, next) {
  res.render('alo', { title: 'Alo Express!' });
});
..
module.exports = router;
Naturally the dependencies and app's configuration must be implemented, for example:
const express = require('express');
const bodyParser = require('body-parser');
const cookeParser = require('cookie-parser');
const app = express();
const passport = require('passport');
const { check, validationResult } = require('express-validator');
const session = require('express-session')
const hbs = require('express-hbs');
const flash = require('flash');
const router = express.Router();
const view_path = __dirname + '/views/';
const public_path = __dirname + '/public/';
app.use(express.static(view_path))
app.use(express.static(public_path));
app.use(bodyParser.json());
app.use(bodyParser.urlencoded({extended: true}));
app.use(cookeParser());
app.use(passport.initialize());
app.use(passport.session());
app.set('view engine', 'html');
app.engine('html', require('hbs').__express);
 
@SEE:
Usando middlewares


Friday, January 17, 2020

Maven compilation asm issue: nested exception is java.lang.IncompatibleClassChangeError: class org.springframework.core.type.classreading.ClassMetadataReadingVisitor has interface org.springframework.asm.ClassVisitor as super class


>PROBLEM


A deployable file is created using:

  mvn clean install


Attempt to run fails:

  java -jar myfile.war

generating the following message (snippets):

org.springframework.beans.factory.BeanDefinitionStoreException: Failed to read candidate component class: URL 
[jar:file:/L:/work/dev/java/projects/tpzapp/parent/sisgit2/sisgit2-2.0.war!/WEB-INF/classes!/br/net/telespazio/sisgit2/app/Sisgit2App.class]; 
nested exception is java.lang.IncompatibleClassChangeError: class org.springframework.core.type.classreading.ClassMetadataReadingVisitor has interface org.springframework.asm.ClassVisitor as super class
 at org.springframework.context.annotation.ClassPathScanningCandidateComponentProvider.findCandidateComponents(ClassPathScanningCandidateComponentProvider.java:311) ~[spring-context-4.3.9.RELEASE.jar!/:4.3.9.RELEASE]
 at org.springframework.context.annotation.ClassPathBeanDefinitionScanner.doScan(ClassPathBeanDefinitionScanner.java:272) ~[spring-context-4.3.9.RELEASE.jar!/:4.3.9.RELEASE]
 at org.springframework.context.annotation.ComponentScanAnnotationParser.parse(ComponentScanAnnotationParser.java:135) ~[spring-context-4.3.9.RELEASE.jar!/:4.3.9.RELEASE]
...
Caused by: java.lang.IncompatibleClassChangeError: class org.springframework.core.type.classreading.ClassMetadataReadingVisitor has interface org.springframework.asm.ClassVisitor as super class
 at java.lang.ClassLoader.defineClass1(Native Method) ~[na:1.8.0_112]
 at java.lang.ClassLoader.defineClass(ClassLoader.java:763) ~[na:1.8.0_112]
 at java.security.SecureClassLoader.defineClass(SecureClassLoader.java:142) ~[na:1.8.0_112]


>SOLUTION


Switched maven's compilation plugins configuration as follows:


>>BEFORE


<packaging>war</packaging>
<plugin>
<groupid>org.springframework.boot</groupid>
<artifactid>spring-boot-maven-plugin</artifactid>
</plugin>
<plugin>
<groupid>org.apache.maven.plugins</groupid>
<artifactid>maven-surefire-plugin</artifactid>
</plugin>


>>AFTER


<packaging>jar</packaging>
<plugin>
<groupid>org.springframework.boot</groupid>
<artifactid>spring-boot-maven-plugin</artifactid>
</plugin>


>ENV

Windows 10
Java 8
Maven 3.x

Saturday, January 11, 2020

Vim editor – Commands’ Summary (Cheat Sheet)


MINI TUTORIAL - MINIMAL KNOWLEDGE


This post intends to give you the very initial steps to begin using Vim, supplying a Cheat Sheet collected from many sources across the years.

To begin, let's create a hello text file.
Using the console (prompt), type the following:

vim hello.txt
Type I (i) to get into "insert mode".
Type: hello world!
Type ESC to exit.
Type colon (:) then x to save:
:x
Use enter to exit.

That's it. You are "initiated" - simple like that.


Vim editor has "modes" - commands' contexts.

When you open the editor you may issue a set of commands.
See basic navigation below.

To enter into edit mode, use insert key or the I(i) key.
To exit from insert mode, use ESC.

On ESC mode, if you type colon (:), you get a command line at the bottom that enables another set of commands. For instance, if you desire to add line numbers, you do: 

Type ESC.
Type colon (:).
Type "set nu"
Type ESC to exit from the command line.

Now the lines have sequential numbers.

Vim is a super editor, having everything you wonder or you even never supposed to.

It worths to get acquainted to it because it is the default editor on most *nix systems, like AIX, Unix and flavors of Linux.

When using console (SSH connection), Vim is the ubiquitous solution - everywhere has a "vim" command available for you.

Although the documentation turns into something scaring it is not a big deal if you dive into its resources by section of interests.
For instance, what do you want to do?
Find a string, replace text, mark a point on the text to get there fast, split windows, compare files, etc.


I know, I know - it is very strange to alternate between insert mode and command mode. Do not complain - it is just a matter of habit. You'll see!  :-)

Advantage of that: you have extra power while having to modes.

Vim, my old friend...


BASIC NAVIGATION (NOT ON INSERT MODE)

NOTE:  the behavior depends upon the keyboard type.
If not working, try the Fn key plus the shortcut.
Example: Fn + k

  • k – navigate upwards
  • j – navigate downwards
  • l – navigate right side
  • h – navigate left side
  • 0 – go to the starting of the current line.
  • ^ – go to the first non blank character of the line.
  • $ – go to the end of the current line.
  • g_ – go to the last non blank character of the line.
  • H – Go to the first line of current screen.
  • M – Go to the middle line of current screen.
  • L – Go to the last line of current screen.
  • ctrl+f – Jump forward one full screen.
  • ctrl+b – Jump backwards one full screen
  • ctrl+d – Jump forward (down) a half screen
  • ctrl+u – Jump back (up) one half screen
  • e – go to the end of the current word.
  • E – go to the end of the current WORD.
  • b – go to the previous (before) word.
  • B – go to the previous (before) WORD.
  • w – go to the next word.
  • W – go to the next WORD.
  • { – Go to the beginning of the current paragraph. By pressing { again and again move to the previous paragraph beginnings.
  • } – Go to the end of the current paragraph. By pressing } again and again move to the next paragraph end, and again.
  • N% – Go to the Nth percentage line of the file.
  • NG – Go to the Nth line of the file.
  • G – Go to the end of the file.
  • `” – Go to the position where you were in NORMAL MODE while last closing the file.
  • `^ – Go to the position where you were in INSERT MODE while last closing the file.
  • g – Go to the beginning of the file.
  • % – Go to the matching braces, or parenthesis inside code.
  • Use ‘.’ to repeat the last command.
    The command will be repeated considering the current caret position.

MORE DETAILED INFORMATION, SEE:

Wednesday, January 8, 2020

Docker: Hardware assisted virtualization and data execution protection must be enable in the BIOS


>PROBLEM

Docker fails to start, returning the following message:

Hardware assisted virtualization and data execution protection must be enabled in the BIOS
See https://docs.docker.com/docker-for-windows/troubleshoot/#virtualization-must-be-enabled


>SOLUTION

Turn on hyper-v.
As Administrator, issue the command:

   bcdedit /set hypervisorlaunchtype auto start

Restart the machine.

*** IMPORTANT NOTE:

Vagrant with VirtualBox require to turn off hyper-v:

  bcdedit /set hypervisorlaunchtype off

That way, if you have both installed, once their configurations are conflicting, it is not possible to have both working at the same time.


>ENV

Windows 10
Vagrant v2.2.6
VirtualBox 6.0

>SEE

Vagrant: The box you're attempting to add doesn't support the provider you requested

Vagrant: There was an error while executing VBoxManage, a CLI used by Vagrant for controlling VirtualBox


Vagrant: There was an error while executing VBoxManage, a CLI used by Vagrant for controlling VirtualBox


>PROBLEM

Starting vagrant:

    vagrant up

Causes the follwing issue:

There was an error while executing VBoxManage, a CLI used by Vagrant for controlling VirtualBox. 
The command and stderr is shown below.

Command: ["startvm", "01748371-61a5-4c0e-a279-9077bab91aaf", "--type", "headless"]
Stderr: VBoxManage.exe: error: Call to WHvSetupPartition failed: ERROR_SUCCESS (Last=0xc000000d/87) (VERR_NEM_VM_CREATE_FAILED)
VBoxManage.exe: error: Details: code E_FAIL (0x80004005), component ConsoleWrap, interface IConsole


>SOLUTION

Turn off  hyper-v.
As administrator, issue the comand:

    bcdedit /set hypervisorlaunchtype off

Restart machine.


*** IMPORTANT NOTE:

Docker requires hyper-v on:

   bcdedit /set hypervisorlaunchtype auto start

So, after the environment is restarted, docker will stop working.
Docker and Vagrant/VirtualBox requires conflicting environment configuration.


Vagrant: The box you're attempting to add doesn't support the provider you requested


>PROBLEM

Starting Vagrant using VirtualBox as follows:

   vagrant up

Fails to start returning this message:

The box you're attempting to add doesn't support the provider you requested. 
Please find an alternate box or use an alternate provider. 
Double-check your requested provider to verify you didn't simply misspell it.

If you're adding a box from HashiCorp's Vagrant Cloud, make sure the box is
released.

Name: ubuntu/trusty64
Address: https://vagrantcloud.com/ubuntu/trusty64
Requested provider: [:hyperv]


If you force, using:

  vagrant up --provider virtualbox

vagrant then returns the following:

Vagrant has detected that you have a version of VirtualBox installed
that is not supported by this version of Vagrant. Please install one of
the supported versions listed below to use Vagrant:
4.0, 4.1, 4.2, 4.3, 5.0, 5.1, 5.2, 6.0

The provider 'virtualbox' that was requested to back the machine
'mongod-m103' is reporting that it isn't usable on this system. The
reason is shown below:

Vagrant has detected that you have a version of VirtualBox installed
that is not supported by this version of Vagrant. Please install one of
the supported versions listed below to use Vagrant:

4.0, 4.1, 4.2, 4.3, 5.0, 5.1, 5.2, 6.0

          A Vagrant update may also be available that adds support for the version
        you specified. Please check www.vagrantup.com/downloads.html to download
        the latest version.


>SOLUTION

Download a version of VirtualBox compatible with Vagrant's version.
For instance, if vagrant v2.2.6, use vitualbox 6.0.

Download here (change the url's version suffix for the one desired):

https://www.virtualbox.org/wiki/Download_Old_Builds_6_0


>ENV

Windows 10
Vagrant v2.2.6
VirtualBox 6.0

Sunday, January 5, 2020

git Changes not staged for commit remove message


>PROBLEM

git status command returns the following message:

  git Changes not staged for commit remove message


>SOLUTION

This kind of problem may be originated when a folder is added to .gitignore without adding and committing the repository before .gitignore inclusion and committing after.
A straightway is to move the folder that contains the inconsistency to a temporary folder. Then add and commit again.

Example, supposing the following project structure:

+-- myProjectRoot
+--folder1
+--folder2
+--folderWithIssue

To fix, do:

cd /home/myProjectRoot
- windows:
cd C:\myProjectRoot

git add *
git commit -am "my message here"

mv /home/myProjectRoot/folderWithIssue /home/temp
- windows:
move folderWithIssue C:\temp

git add *
git commit -am "my message here"
git push

mv /home/temp/folderWithIssue .
- windows:
move C:\temp\folderWithIssue .

git add *
git commit -am "my message here"
git push


node.js: morgan deprecated default format: use combined format


>PROBLEM

The server throws the following server's message:
  morgan deprecated default format: use combined format

>SOLUTIONS

>>POSSIBILITY #1 ----------------------------------

BEFORE:
app.use(logger);


AFTER:
app.use(logger('combined'));


@FROM:
stackoverflow.com/questions/36397812/morgan-deprecated-expressjs/36398066


>>POSSIBILITY #2 ----------------------------------

BEFORE:
app.use(logger(process.env.AMBIENTE));
...
require('dotenv').config();


AFTER:
require('dotenv').config();
..
app.use(logger(process.env.AMBIENTE));

Friday, December 27, 2019

WordPress fails to update plugins, Posts or Sign in


NOTE: 
Although the examples concern to Linux env, an analogy may be done to other environments converting the commands and paths.
In the examples below, replace "mysite" by the name of your site folder.

>ATTEMPT #1 - FILES' PERMISSION

Check the owner of your data, if www-data, do:

chown www-data -R /home/mySite/public_html
chgrp www-data -R /home/mySite/public_html

>ATTEMPT #2 - PLUGIN'S ISSUE

CHECKING ONE BY ONE BEGINNING BY THE LAST ONES

If the issue happens after plugins' update or a new plugin installation, it is necessary to identify the plugin that causes the issue.
In this case, just remove the plugin by moving its code to a temporary folder.
If the issue disappears, the last removal indicates the responsible.
Example:

mv /home/mysite/public_html/wp-content/plugins/do-something /home/temp/plugins


REMOVING ALL AND REINSERTING ONE BY ONE 

Another method removes all and insert one by one (or small groups) until the issue comes up, identifying the cause.
Example reinserting a group of three:

mv /home/mysite/public_html/wp-content/plugins /home/temp
mkdir /home/mysite/public_html/wp-content/plugins
mv /home/temp/plugins/do-something /home/mysite/public_html/wp-content/plugins
mv /home/temp/plugins/do-something2 /home/mysite/public_html/wp-content/plugins
mv /home/temp/plugins/do-something3 /home/mysite/public_html/wp-content/plugins
chown www-data -R /home/mySite/public_html/plugins
chgrp www-data -R /home/mySite/public_html/plugins
#Go to the site, menu, plugins and activate the inserted plugins, then test.
#If the issue returns, one of the new three plugins is the responsible.
#To discover the one, repeate the operation removing the three ones and inserting one by one.
More details at:


>ATTEMPT #2 - WORDPRESS FILES' ISSUE

If the attempt one is ineffective, then it may be a major problem like Wordpress corruption, considering that any other procedure above was successful.

>PROBLEM

The site fails to update post.
Attempt to update a plugin works differently, redirecting to another page retuning a detailed log like wordpress upgrade - unusual since upgrade is done on the same page - the plugins' page.
After log off, login also fails.
The problem comes apparently from nothing.

>SOLUTION

Rename the current site to preserve its content.
Performed a new Wordpress installation but preserving its current database.
The new installation is connected to the previous database.
The configurations and contents from the previous installation are copied to the new one, including plugins, uploads and other key folders.

Example:

- database backup, just in case:
  mysqldump --all-databases --routines  --triggers -uroot -proot > dump.sql

- creating a new mysite directory to install a new wordpress:
  mv /home/mysite /home/mysite_
  mkdir /home/mysite
  chown root:root -R /home/mysite
  chmod 755 -R /home/mysite
  mkdir /home/mysite/public_html

- set permissions required by wordpress running by apache2:
  chown www-data -R /home/mysite/public_html

- create log dir:
  mkdir /home/mysite/public_html/logs

- installing the new site:
  cd /home/backup/wordpress
  unzip wordpress-5.3.2-en_GB.zip
  mv wordpress/* /home/mysite/public_html
  chown www-data -R /home/mysite/public_html
  chmod 755 -R /home/mysite/public_html

- create a symlink on apache2's /var/www folder:
  cd /var/www
  ln -s /home/ipstuff/public-html mysite

- point to mysite:  
  http://ultering.com/mysite/

- get the database information
database name: mysite
username: mysite
password: secret
host: localhost

- after the initial login, the key folders are copied from previous intallation to preserve configuration and content:

  rm -Rf /home/mysite/public_html/wp-content/plugins
  cp -R /home/temp/mysite/plugins /home/mysite/public_html/wp-content
  chown www-data -R /home/mysite/public_html
  chmod 755 -R /home/mysite/public_html

  cp -R /home/mysite_/public_html/wp-content/themes/* /home/mysite/public_html/wp-content/themes

   cd /home/mysite

- backup from previous content, just in case:   
   tar czvf itstuf_temp.tar.gz /home/mysite/public_html

- copying key folders containing content and configuration:
  cp -R /home/mysite_/public_html/wp-content/uploads /home/mysite/public_html/wp-content
  cp -R /home/mysite_/public_html/wp-content/w3tc-config /home/mysite/public_html/wp-content
  cp -R /home/mysite_/public_html/wp-content/wflogs /home/mysite/public_html/wp-content
  cp -R /home/mysite_/public_html/wp-content/nfwlog /home/mysite/public_html/wp-content
  cp -R /home/mysite_/public_html/wp-content/.tmb /home/mysite/public_html/wp-content
  cp -R /home/mysite_/public_html/wp-content/.quarantine /home/mysite/public_html/wp-content
  cp -R /home/mysite_/public_html/wp-content/mu-plugins /home/mysite/public_html/wp-content
  cp -R /home/mysite_/public_html/wp-content/wp-link-status-salt.php /home/mysite/public_html/wp-content
  cp -R /home/mysite_/public_html/wp-content/index.php /home/mysite/public_html/wp-content

- moving the backup to a temp dir to be downloaded and removed:  
  mv /home/mysite/public_html/wp-content/uploads /home/temp


Tuesday, August 20, 2019

ECLIPSE - Cannot change version of project facet Dynamic Web Module to 3.1


>PROBLEM

Attempt to switch Web Module version in "Project Facets" is denied, not allowed, returning a message like this:

Cannot change version of project facet Dynamic Web Module to 3.1. sisgit2 line 1 Maven Java EE Configuration Problem


>SOLUTION

Go to the eclipse's project root directory at:

$ECLIPSE_PROJECT_ROOT\.settings\org.eclipse.wst.common.project.facet.core.xml


Change here:
From:
<installed facet="wst.jsdt.web" version="1.0"></installed>
To:
<installed facet="jst.web" version="3.1"></installed>

>ENV

Windows 10
Eclipse 2019


@FROM:
stackoverflow.com/questions/18122336/cannot-change-version-of-project-facet-dynamic-web-module-to-3-0

eclipse: java: SLF4J: Failed to load class "org.slf4j.impl.StaticLoggerBinder" or Exception in thread "main" java.lang.NoClassDefFoundError: org/slf4j/impl/StaticLoggerBinder

  >PROBLEM Using Eclipse, you try to run a simple logging test using "org.slf4j.Logger" like the sample below: package Test; im...